A Tour of the Hyper-V Manager Tool
Anyone deploying virtual machines using Microsoft Hyper-V will likely spend a considerable amount of time interacting with the Hyper-V Manager MMC Snap-in. As such, it is important to gain a good understanding of how to use this administrative tool. This chapter is intended to provide a basic overview of the Hyper-V Manager tool and cover the basics of using this tool to modify some key server settings.
Installing the Hyper-V Management Snap-in
The Hyper-V Manager snap-in is installed by default when the Hyper-V role is installed on a Full Windows Server 2008 installation. Given that the snap-in is graphical in nature, it is not installed on the command-line based Windows Server 2008 Core installation. The only way to manage Hyper-V on a Windows Server 2008 Core installation using the Hyper-V Manager is to do so remotely by running the snap-in on a system running a full Windows Server 2008 or Windows Vista installation.
To facilitate remote Hyper-V administration from systems that are not running Hyper-V, the snap-in may also be installed as a stand-alone tool on Windows Server 2008 and Windows Vista SP1 Enterprise and Ultimate editions.
Both the Hyper-V Manager snap-in and the Virtual Machine Connection tool may be installed on Windows Vista by installing the Windows Vista SP1 Management Tools Update package which is available for download from the Microsoft web site.
Launching the Hyper-V Manager
The Hyper-V Manager may be invoked using a number of different techniques, each of which will be outlined in this section.
- Administrative Tools Menu - Launch Hyper-V Manager by clicking on the Start -> Administrative Tools -> Hyper-V Manager menu option.
- Server Manager - Launch the Server Manager either from the Start -> Administrative Tools -> Server Manager menu option, or by clicking on the Server Manager icon in the task bar along the bottom of the desktop. When Server Manager is running unfold Roles followed by Hyper-V in the left hand panel by clicking on the + signs next to the corresponding item. From the Hyper-V branch click on Hyper-V Manager to display the tool on the main panel.
- Search - Click on the Start button, enter Hyper-V into the Search box and press enter.
Any of the above techniques will result in the Hyper-V Manager launching. The next step is to explore some of the features of this tool.
A Quick Tour of the Hyper-V Manager
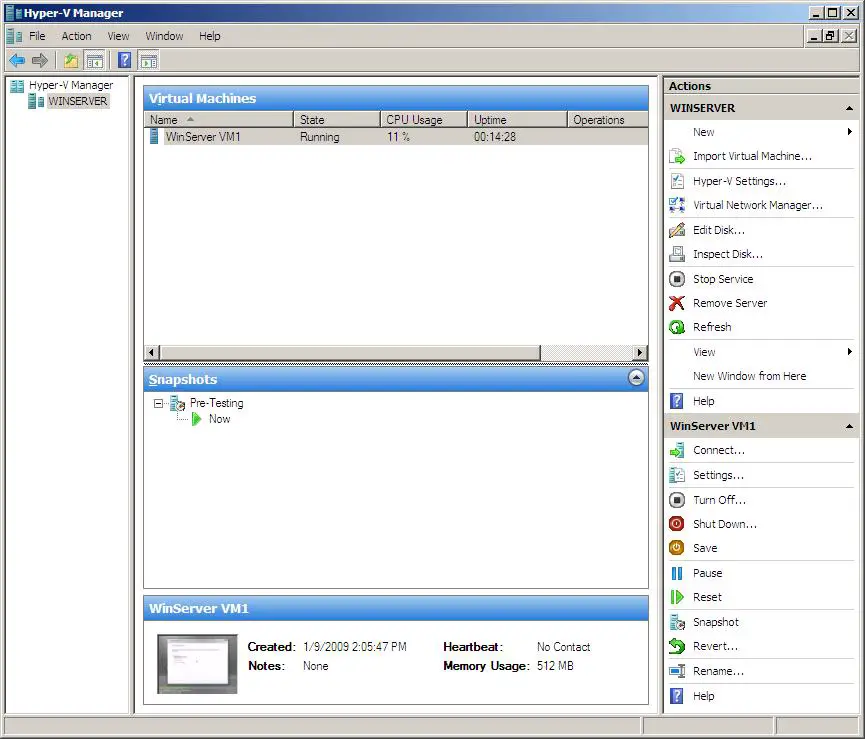
Once the Hyper-V Manager has loaded, it will appear as illustrated in the following figure:
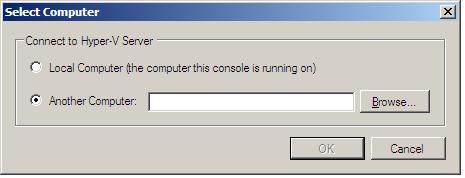
The panel running along the left hand side of the Hyper-V Manager window contains a list of Hyper-V servers which are available for administration. By default the local server will be listed, although remote Hyper-V servers may also be added to the list and managed from this Hyper-V Manager instance by right clicking on the Hyper-V Manager item in this panel and selecting Connect to Server.... When selected, this menu option will display the Select Computer dialog. From this dialog it is possible to select the local system (if it is not already listed) or to browse the network to find other remote Hyper-V servers:
Once connections to remote servers running Hyper-V are connected they will appear in the list along with the local system. Servers may be removed from the list by selecting the server from the list and clicking on the Remove Server link in the Actions panel on the right hand side of the Hyper-V Manager window.
The central panel is divided into three sub-panels. The top provides a list of virtual machines which are configured on the server which is currently selected in the right hand panel. When a virtual machine is selected from the list, a collection of actions for that virtual machine will appear in the right hand Actions panel. The same list of virtual machine specific commands may also be accessed from a popup menu by right clicking on the VM from the list. In order to view the console of a running virtual machine, select the Connect... action option. Once selected, a new window will appear displaying the console for the virtual machine. The following figure shows the console for a virtual machine which is installing Windows Server 2008 as a guest:

