Installing the Hyper-V Role
| Previous | Table of Contents | Next |
| Hyper-V System Requirements | A Tour of the Hyper-V Manager Tool |
Microsoft Hyper-V is included as a standard feature of the 64-bit version Windows Server 2008 Standard, Enterprise and Datacenter editions. In addition, Hyper-V is available in both the full and core variants of these platforms. The Hyper-V role is not, however, installed and activated by default. The objective of this chapter, therefore, is to provide an overview of the steps involved in installing the Hyper-V role on a Windows Server 2008 system.
System Requirements
The remainder of this chapter assumes that a 64-bit edition of Windows Server 2008 is installed and running on a system with appropriate hardware to support hypervisor based virtualization. Detailed information on these requirements within the context of Hyper-V based virtualization is outlined in the chapter entitled Hyper-V System Requirements.
Installing the Hyper-V Role from the Command Prompt
As previously mentioned, Hyper-V is bundled by default with the 64-bit version of Windows Server 2008 Standard, Enterprise and Datacenter editions. Before it can be used, however, the Hyper-V role must be installed. This process is achieved using either the Server Manager tool, or via the command-prompt. To perform the installation at the command line, open a command prompt window with elevated privileges (right click on the command prompt icon in the Start menu and select Run as administrator from the resulting menu) and enter the following command:
C:\Users\Administrator>servermanagercmd -install hyper-v
..

Start Installation...
Warning: [Installation] Succeeded: [Hyper-V]. You must restart this server to
finish the installation process.

<100/100>

Success: A restart is required to complete the installation.
Assuming this initial stage of the Hyper-V installation process is successful, a reboot of the system will, as indicated by the above output, be necessary to complete the installation process.
Installing Hyper-V on Windows Server 2008 Core
The Hyper-V role may be installed on a Windows Server 2008 Core system using the following command:
start /w ocsetup Microsoft-Hyper-V
Installing the Hyper-V Role using Server Manager
For those who prefer using the graphical desktop environment when performing administrative tasks, the Hyper-V role may be installed using the Server Manager tool (Start->Administrative Tools->Server Manager). With Server Manager running, select Roles from the left hand panel followed by Add Roles in the main panel to invoke the Add Roles Wizard. If the Welcome screen is displayed, click Next to proceed to the Select Server Roles screen as illustrated in the following figure:
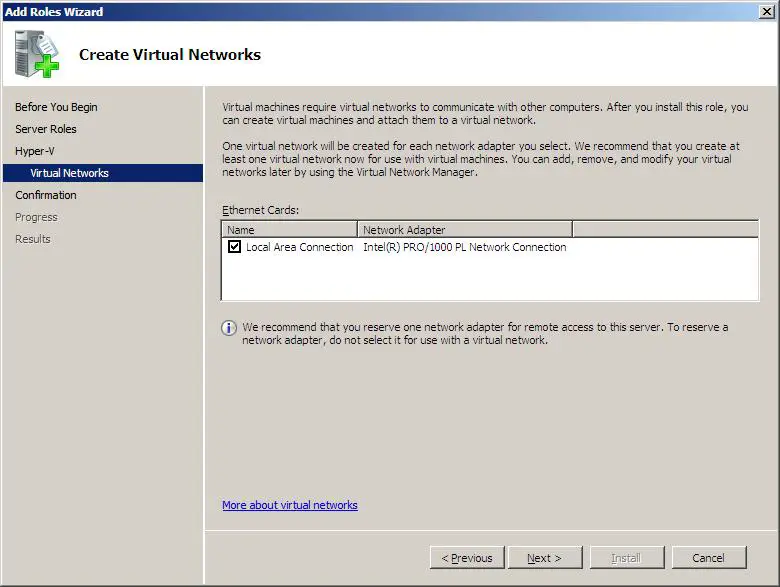
Select the Hyper-V role and click Next to proceed. The next screen will provide information about Hyper-V and its associated hardware requirements. After reading this information, click Next to display the Create Virtual Networks screen.
In order to communicate with the external network to which the host server is connected, virtual machines need to be able to use a physical network adapter installed on the host computer system. Hyper-V controls this access by creating one or more virtual networks to which virtual machines are connected. In terms of access to the external network, there is a one to one correlation between virtual networks and physical network adapters installed into the host computer. Multiple virtual networks may not share the same physical network adapter. For additional information on this topic, refer to the chapter entitled Understanding and Configuring Hyper-V Virtual Networks. This stage of the Hyper-V installation process provides a list of network adapters detected on the host system and provides the option to select the devices for which virtual networks are to be created:
With the required network adapters selected from the list, click on Next to display the Confirmation screen, review the configuration information displayed and click Install to initiate the installation process. Complete installation of Hyper-V requires a system reboot.
Verifying the Hyper-V Installation
After the installation is complete Hyper-V should be installed and ready for use. To confirm that Hyper-V is installed, open the Hyper-V Manager (Start->Administration Tools->Hyper-V Manager).
To begin creating Hyper-V virtual machines, refer to the chapter entitled Creating Hyper-V Virtual Machines.
Uninstalling the Hyper-V Role
If, at any point in the future, the Hyper-V role is no longer required on the server it may be removed either from the command prompt or via the Server Manager tool. It is important to note that removal of the Hyper-V server role does not remove any virtual machines and associated virtual disks that have been configured on the server. If the virtual machines are no longer required, they should be manually deleted using the Hyper-V Manager tool prior to uninstalling Hyper-V.
To uninstall Hyper-V from a command prompt (administrator privileges are required), use the servermanagercmd as follows:
C:\Users\Administrator>servermanagercmd -remove hyper-v
..

Start Removal...
Warning: [Removal] Succeeded: [Hyper-V]. You must restart this server to finish
the removal process.

<100/100>

Success: A restart is required to complete the removal.
To perform the removal using Server Manager, select Roles from the left hand panel of the Server Manager interface and click on Remove Roles to invoke the Remove Roles Wizard. Deselect the Hyper-V option from the list of server roles and click Next. Review the information on the Confirmation screen and click Remove to perform the removal. It is typically necessary to restart the system to complete the Hyper-V removal process.


