Difference between revisions of "Creating and Managing VMM 2008 Virtual Machine Templates"
(→Creating a Guest Operating System Profile) |
|||
| Line 77: | Line 77: | ||
The following settings are available for configuration: | The following settings are available for configuration: | ||
| − | * '''Computer name''' - Allows the name of the computer to be defined. Since a profile may be used for many different virtual machines on the same network, having the | + | * '''Computer name''' - Allows the name of the computer to be defined. Since a profile may be used for many different virtual machines on the same network, having the same computer name for all systems is likely to cause problems. To avoid this problem, an asterisk may be entered into this field to instruct VMM to assign a random computer name to the guest OS when it is created. |
* '''Admin Password''' - The password for the Administrator account on the guest operating system. | * '''Admin Password''' - The password for the Administrator account on the guest operating system. | ||
Revision as of 21:14, 18 February 2009
VMM 2008 Virtual Machine templates are stored in VMM Libraries and allow new virtual machines to be created quickly and with consistent hardware and operating system configurations. Templates also control the virtual machine configurations that are available to users when creating new virtual machines within VMM Self-Service Portals.
This chapter of VMM 2008 Essentials provides an overview of the various elements that comprise a template and covers the basics of creating and managing VMM 2008 virtual machine templates.
An Overview of a Virtual Machine Template
Virtual Machine templates are created from within the VMM Administrator Console and are stored in a VMM Library ready to be accessed when creating new virtual machines, either from the VMM Administrator Console, or from within the VMM Self-Service Portal. In fact, virtual machines may only be created from within the Self-Service portal based on a pre-existing template specification.
A virtual machine template typically consists of a virtual hard disk and two configuration groups known as profiles:
- Hardware Profile - A hardware profile defines hardware configuration settings such as CPU, memory, network, BIOS and device resources to be used when a new virtual machine is created using a template.
- Operating System Profile - Defines operating system configuration settings which are imposed on a new virtual machine created from a template. Allows configuration of settings such as the type of operating system, computer name, administrator password, product key, timezone, domain, answer file and run once file.
- Virtual Hard Disk - A standard virtual hard disk to be used by the new virtual machine. The disk may a virtual hard disk stored in a VMM Library, or a disk from an existing virtual machine. The VMM Library contains two blank disks by default (a small 16GB disk and large 60GB disk) which may be used for this purpose.
Both hardware and guest operating system profiles may be created independently of the template and stored in the VMM Library. Once stored, they may be imported into new templates during the template creation process. One point to note is that after a profile has been imported into a template there is no ongoing relationship between the template and the profile. As such, any subsequent changes to the configuration settings in the profile will not be reflected in the templates and vice versa.
Creating a Hardware Profile
As previously described, hardware profiles define a baseline hardware configuration for a virtual machine. Once created, a hardware profile may be imported into new templates as they are created. Any virtual machines which are subsequently created using those templates will be configured to match the corresponding hardware profile.
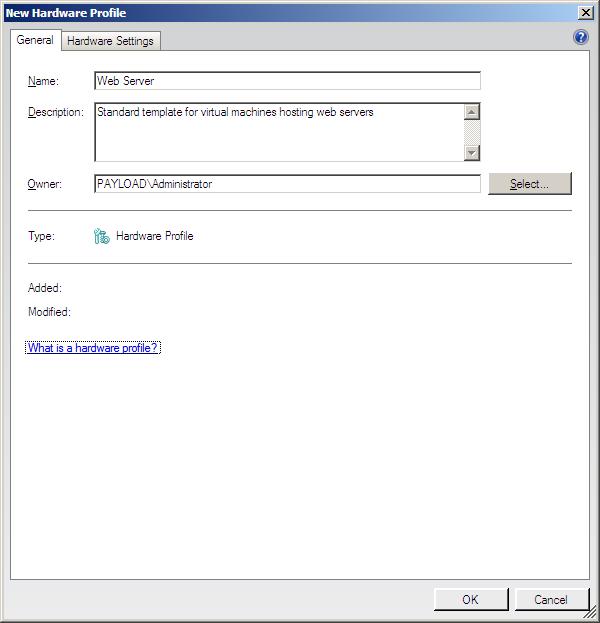
Hardware profiles are created from the Library view of the VMM Administrator Console. For details on how to launch the console, refer to the chapter entitled A Guided Tour of the VMM Administrator Console. Once the console is running and connected to the desired VMM Server, click on the Library button in the bottom left pane of the window. Once the Library view is displayed, click on the New hardware profile link located in the Actions pane on the right side of the window. Once selected, the New Hardware Profile wizard will appear as illustrated in the following figure:
The General screen requires that the profile be given a name. An optional description may also be entered together with the identity of the owner of the profile. The owner of the profile must have an account in the Active Directory domain.
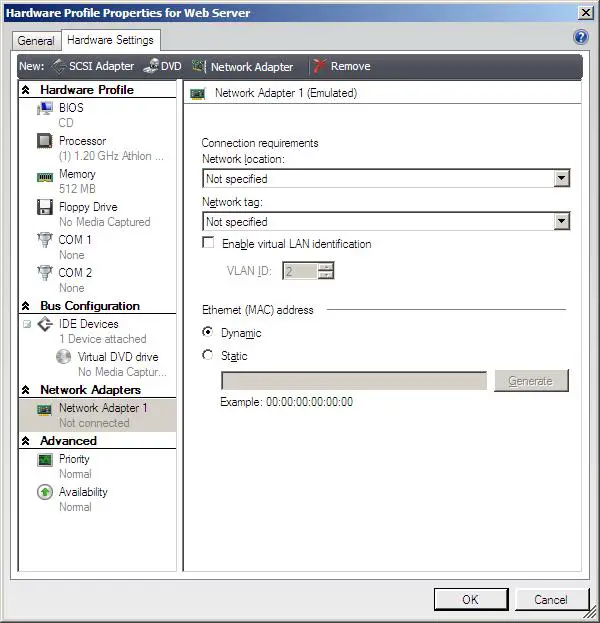
Once the general settings have been configured, clicking the Hardware Settings tab displays the hardware configuration for the profile. This page allows the following hardware settings to be configured for the profile:
- BIOS - Boot device start-up order and initial Num Lock key settings.
- CPU - CPU type, number of CPU cores assigned to the VM and CPU functionality setting for legacy guest operating systems.
- Memory — Amount of memory to be allocated to the virtual machine.
- Floppy Drive — Optional virtual floppy drive.
- IDE/SCSI Controllers - SCSI and IDE Controllers to which virtual hard disk, CD and DVD drives will be connected.
- CD/DVD Drives - Virtual CD/DVD drives. Mapped either to physical devices or to ISO file images.
- Network Adapters — Virtual network adapters for the virtual machine.
- Priority - Specifies priority for virtual machine when CPU resources are allocated on heavily loaded hosts.
- Availability — Whether or not the virtual machine should be assigned to a clustered server.
New disk controllers, DVD devices and network adapters may be added using the toolbar buttons above the hardware list. In addition, the existing configuration entries may be removed from the profile by selecting the item from the list and clicking the Remove button. Note that memory and CPU settings may be modified, but not removed from the profile:
Once the settings are complete, click on OK to create the new profile. After the hardware profile has been created, it will be listed under Profiles in the Resources pane located in the top left corner of the VMM Administrator console window. The settings may be changed at any time by right clicking on the profile and selecting Properties from the resulting menu. Similarly, a hardware profile may be copied or deleted by right clicking on the required profile and selecting Copy or Delete respectively.
Once the hardware profile has been created it is ready to be used in the creation of a virtual machine template. Before getting to that point, however, we will first look at the creation of a new guest operating system profile.
Creating a Guest Operating System Profile
Guest operating system profiles provide an outline configuration for the operating system which is to run inside a virtual machine. As with the hardware profile, a guest OS profile may be imported during the construction of a virtual machine template.
Guest Operating System profiles are also created from within the Library view of the VMM Administrator Console. With the view displayed, click on the New guest OS profile link located in the Actions pane to invoke the wizard as illustrated below:
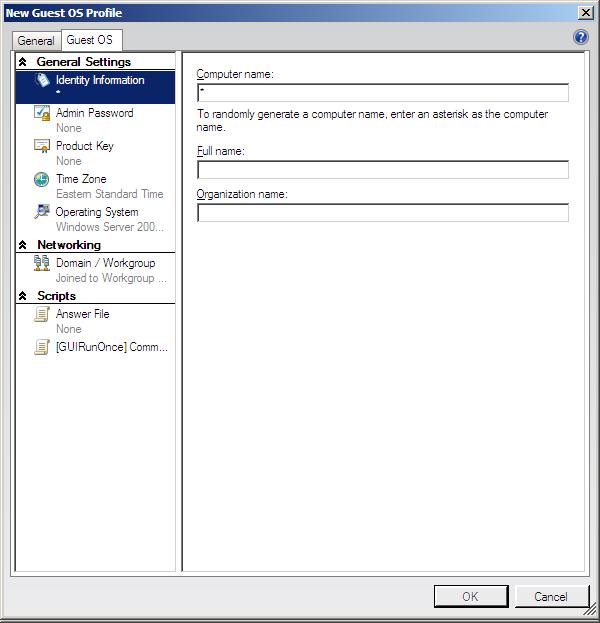
The General screen requires that the profile be named and an owner with an Active Directory domain account assigned. An optional description may also be provided. The Guest OS tab allows a number of operating system specific settings to be configured into the profile:
The following settings are available for configuration:
- Computer name - Allows the name of the computer to be defined. Since a profile may be used for many different virtual machines on the same network, having the same computer name for all systems is likely to cause problems. To avoid this problem, an asterisk may be entered into this field to instruct VMM to assign a random computer name to the guest OS when it is created.
- Admin Password - The password for the Administrator account on the guest operating system.
- Product Key - The product key needed to register the guest operating system after installation.
- Time Zone - The time zone in which the virtual machine and guest operating system will be operating.
- Operating System - The operating system type which will be running in the virtual machine.
- Domain/Workgroup - The Windows Workgroup or Active Directory Domain of which the guest operating system is to be a member. In the case of a domain based guest, the user name and password of a user may be provided.
- Answer file - An optional answer file to automate the installation process of the guest OS in the form of a SysRep.info or Unattend.xml file. The file must be stored in the Library share folder.
- GUIRunOnce Commands - Commands to be executed the first time a user logs into the guest operating.
Once the settings are complete, click on OK to create the new profile. After the guest OS profile has been created, it will be listed under Profiles in the Resources pane located in the top left corner of the VMM Administrator console window. The settings may be changed at any time by right clicking on the profile and selecting Properties from the resulting menu. Similarly, a guest operating system profile may be copied or deleted by right clicking on the required profile and selecting Copy or Delete respectively.
Creating a New Virtual Machine Template
VMM virtual machine templates are created from the Library view of the VMM Administrator Console. They may be constructed by manually entering the configuration settings for the hardware and guest operating system profile, or pre-existing profiles stored in the VMM Library may be imported to speed the creation process and ensure configuration consistency across multiple templates.
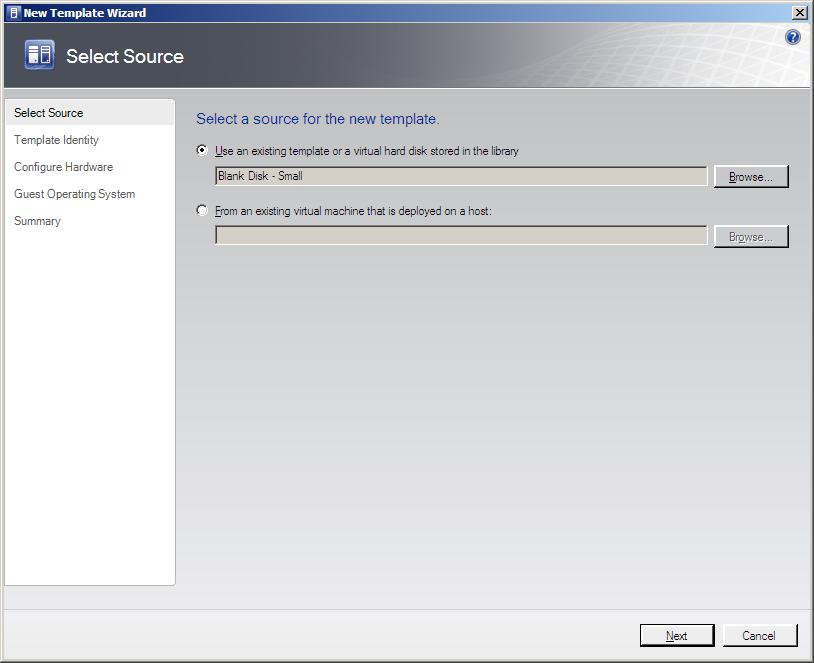
The template creation process begins by selecting the Library view of the VMm Administrator Console and clicking on the New template link located in the Library Actions section of the Actions pane located on the right hand side of the console window. This selection will invoke the New Template wizard as shown below:
The first screen is where the source of the template is to be found, either in the form of an existing virtual hard disk stored in the Library, or from an existing virtual machine. In order to base the new template on an existing virtual machine, use the Browse button to navigate to the desired virtual machine.
Before using an existing virtual machine as the basis for a template there are some important points to be aware of. Firstly, the source virtual machine will be destroyed as part of the template creation process. To avoid this, be sure to clone the virtual machine and use the clone as the source for the template. Secondly, in order for an existing virtual machine to be used as the basis for a template, the machine must be powered off. Currently running virtual machines will not be included in the list of those available for use as the basis for a template.
If, on the other hand, an existing virtual hard disk is to be used, use the corresponding Browse button to navigate to the required item. By default two blank hard disks are stored in the VMM Library for this specific purpose (a small 16GB disk and large 60GB disk).
Having selected a suitable source for the template, click the Next button to proceed to the Template Identity screen where the template should be given a name and optional description. If the default owner displayed by the wizard is incorrect, either enter the correct owner identity or use the Browse button to identify an another user before clicking Next to proceed to the Hardware Configuration screen:
On the hardware configuration screen, a number of options are available depending on the template source specified on the first screen and the overall configuration requirements:
- If the template was sourced from an existing virtual machine, the hardware configuration settings are populated with the settings from that virtual machine and may not be altered. Settings from a pre-existing hardware profile may, however, be imported and subsequently modified by selecting the desired hardware profile from the Hardware profile menu.
- If a pre-existing virtual hard disk was selected from the library as the source for the template, the Hardware profile menu selection may be left as [New] and the configuration settings manually configured to meet the requirements for the virtual machine.
- If a pre-existing virtual hard disk was selected from the library as the source for the template, the configuring from an existing hardware profile may be imported by selecting the profile name from the Hardware profile menu. Once applied, the profile settings may be modified before proceeding with the template creation process.
Once the hardware settings have been configured, click next to proceed to the Guest Operating System screen. If the template was sourced from an existing virtual machine, all settings may be inherited from that machine by selecting the Customization is not required option of the Guest operating system profile menu. Alternatively, new settings may be configured by selecting [New]. Yet another option is to import the settings from an existing guest operating system profile by selecting the profile name from the Guest operating system profile menu.
Clicking Next after the guest operating system profile settings have been configured displays the Select Library Server screen. By default, the wizard will list library servers it is already aware of. Select the required server and click Next to proceed to the Select Path screen. Use the Browse button to select an appropriate location in the VMM Library share folder to store the template. Once a location has been specified, click Next, review the Summary screen and, assuming the summary matches expectations, click Create to generate the template. The template creation process may take some time to complete depending on the size of the virtual hard disk. If the template is based on an existing virtual machine, the process involves the running of sysprep on the guest operating system image which may take a considerable amount of time.
Creating a Virtual Machine from a Template
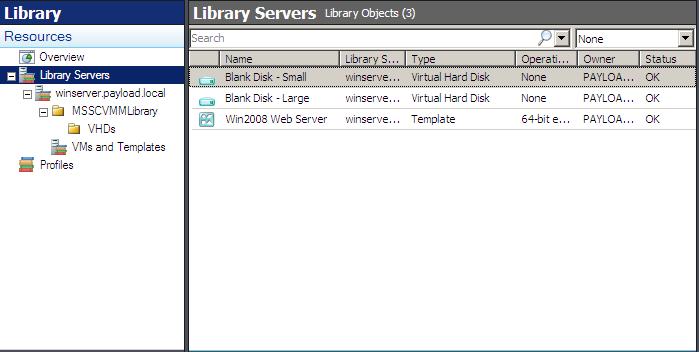
Once a template has been created it is ready to be used to create virtual machines on host systems. To create a new virtual machine, ensure that the Library view of the VMM Administrator Console is displayed and select the Library Servers entry in the Library Resources pane in the top left hand corner for the console. Once selected, a list of templates will appear in the center pane:
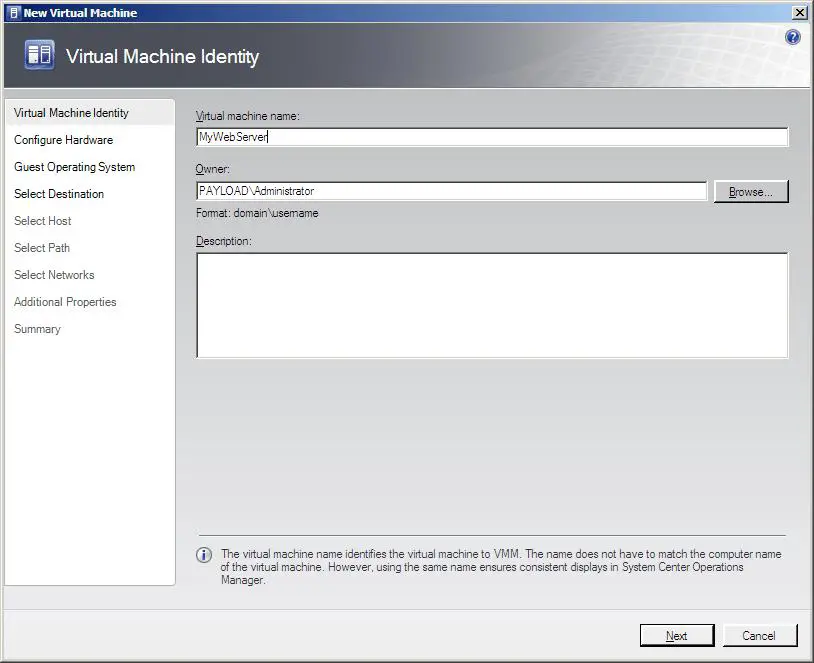
To create a virtual machine based on the template, right click on the template in the list and select New virtual machine from the resulting menu to display the New Virtual Machine wizard as illustrated below:
On the initial screen, enter the name for the new virtual machine and click Next to proceed to the Hardware Settings screen. This screen will contain the settings pre-configured from the template and do not need to be configured unless there is to be any deviation from the template settings. The same is true of the Guest Operating System screen which is displayed when the Next button is pressed. The next screen entitled Select Destination defines where the new virtual machine is to placed. The only option available here is to create the virtual machine on a host, so keep the default and proceed to the Select Host screen.
The Select Host provides a list of available hosts. Select the desired target host for the virtual machine, proceed to the Select Path screen and choose a location on the target host file system for the new virtual machine. Click Next to choose the virtual networks on the target host to which any configured network adapters are to be connected.
The Additional Properties screen provides the option to define what should happen to the virtual machine when the target host system starts up and stops. The final screen displays a summary of the new virtual machine settings. Review the information and click Create to create the new virtual machine on the selected host.
