Difference between revisions of "Configuring VMware Server 2.0 Host-Wide Settings"
m (Text replacement - "<google>BUY_VMWARE_SERVER_2</google>" to "<htmlet>vmware</htmlet>") |
m (Text replacement - "<google>BUY_VMWARE_SERVER_2_BOTTOM</google>" to "<htmlet>vmware</htmlet>") |
||
| Line 104: | Line 104: | ||
| − | < | + | <htmlet>vmware</htmlet> |
Latest revision as of 18:48, 29 May 2016
| Previous | Table of Contents | Next |
| Working with VMware Tools Scripts and Power States | VMware Server Virtual Network Architecture |
| Purchase and download the full PDF and ePub editions of this VMware eBook for only $8.99 |

|
When creating virtual machines within VMware Server 2.0 there is a tendency to focus primarily on the configuration settings specific to each individual virtual machine. One area of configuration which it is important not to overlook when administering a VMware Server based virtualization infrastructure involves the host-wide configuration settings which impact all virtual machines. VMware Server 2.0 provides a number of host-wide configuration settings, an understanding of which is vital to the operation and overall performance of both the virtual machines and host system itself.
Host-wide Memory Settings
Inherent in the concept of virtualization is the fact that a virtual machine must share the physical memory of the host computer system both with other virtual machines and the host operating system. When each VMware Server virtual machine is created, the amount of memory allocated to the particular machine is specified during the initial configuration process and may subsequently be modified using the management tools provided. As such, the host is responsible for allocating memory and will allocate memory based on the requirements of the virtual machines in conjunction with the needs of the host operating system and any other host based processes that happen to be running at any particular time. The key issue with this scenario, however, is that VMware Server is free to request as much memory as necessary to run virtual machines. Without some form of cap on the amount of memory that can requested, there is a danger that so much memory will be requested by virtual machines that there will be insufficient memory for the host operating system and other applications to function, thereby degrading the overall performance of the host, and inevitably also the virtual machines.
In order to address this potential problem, VMware Server allows the configuration of a host-wide VMware Server reserved memory limit. This limit specifies the maximum amount of memory VMware Server can request for running virtual machines. Arriving at the correct setting is something of a balancing act and depends on both the physical memory capacity of the host and the requirements of the virtual machines. When more host memory is requested for virtual machines than is allowed by the limit the memory the virtual machines will perform slowly or fail to power on. If the reserve limit is set too high, there is the danger that the host performance will be impacted if virtual machines use the entire reserved memory.
When the memory limit is higher than the current usage, however, the unused portion of the reservation is still available for use by the host and other applications. As such, it is important to understand that this setting is in no way a guarantee of the amount of memory that is available to virtual machines (since the memory may already be in use by other application by the time VMware requests it for a newly started virtual machine), but rather a limit on the amount of memory that can be requested by VMware.
The amount of memory that may be used by VMware Server for virtual machines is configured using the VI Web Access management interface (details of which are covered in the A Guided Tour of the VMware Server 2.0 Infrastructure Web Access Interface chapter of this book).
To alter the reserved memory limit, log into the VI Web Access interface as a user with administrative privileges, select the host from the Inventory panel, and click on the Edit Host Settings link in the Commands panel to invoke the following dialog:
In the Reserved Memory section of the dialog, the reserve limit is defined in the Size field. By default this value will likely be set at the maximum allowed limit. Once a new limit has been defined, click on the OK button to commit the change and dismiss the dialog.
Memory Swapping Configuration
In an ideal world, computers would have enough physical memory to run as many applications concurrently as any user could ever need. Unfortunately, that day has yet to come and most computer systems quickly use up all the available memory. In this scenario, the operating system performs a task called swapping whereby data held in memory is written to a hard disk to make room for other data. When the data written to the swap space on the disk is needed, the operating system writes some other memory based data to the disk to make room, and then reads previously swapped data back into memory. Whilst this seems like an elegant solution to the problem of limited memory availability, it has the downside that disk drives work much more slowly than random access memory (RAM). The more an operating system has to swap memory, therefore, the slower it will run.
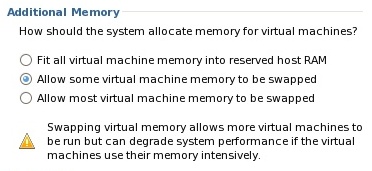
As the use of memory and swap space have a significant impact on the performance of both the host system and virtual machines, VMware Server provides a number of configuration options in this area. To change host memory swapping settings, log into VI Web Access as a user with administrative privileges, select the host from the Inventory panel and click on Edit Host Settings in the Commands panel. The relevant settings are listed in the Additional Memory section of the dialog as illustrated in the following panel:
The advanced memory settings provide three options each of which are described in the following table:
|
Memory Option |
Description |
|---|---|
|
Fit all virtual machine memory into reserved host RAM |
Restricts virtual machines to running in memory only. Virtual machines are not swapped to disk thereby providing maximum performance. The host system must have sufficient memory for the host operating system, all virtual machines and other host based applications. |
| Allow some virtual machine memory to be swapped | Allows some, but not all, of the memory used by virtual machines to be swapped to disk by the host operating system. Results in some performance degradation as compared to running solely in memory, but allows a greater number of virtual machines to be run concurrently. |
|
Allow most virtual machine memory to be swapped |
Allows a larger amount of memory used by virtual machines to be swapped to disk. Allows the greatest number of virtual machines to run concurrently, but at the greatest risk of decreased overall performance due to potentially excessive swapping operations. |
Host-wide Virtual Machine Startup and Shutdown
VMware Server 2.0 provides for the host-wide configuration of startup options for virtual machines. These settings control whether all virtual machines start up automatically when the host systems boots up, the order in which the virtual machines are started, and the delay (if any) between each virtual machine starting. This, for example, allows a virtual machine hosting a database server to be brought online before starting a web server system which might rely on the database to function.
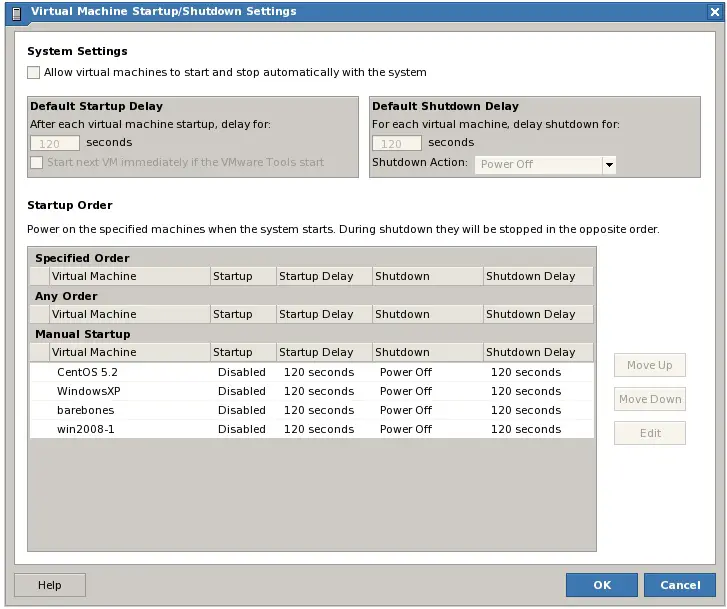
As with other host-wide settings, virtual machine startup and shutdown settings are configured through the VI Web Access interface. To modify these settings, begin by logging into VI Web Access as a user with appropriate administrative privileges, select the host system from the Inventory panel and click on Edit Virtual Machine Startup/Shutdown Settings from the command panel. This will launch the following settings dialog:
To enable the automatic startup and shutdown of virtual machines when the host power state changes, select the box next to Allow virtual machines to start and stop automatically with the system.
To impose a delay between starting or stopping each virtual machine, enter the required timeout durations in the Default Startup Delay and Default Shutdown Delay fields. In the case of the host shutting down, it is also possible to select the shutdown mechanism used to power off any currently running virtual machines using the Shutdown Action menu.
Since the purpose of the startup delay is to ensure that each virtual machine is fully booted before starting the next virtual machine, an interesting option is available for guest operating systems which have VMware Tools installed. Since VMware Tools are amongst the first processes to be started once a guest operating system has completed its startup process, VMware Server can be instructed to ignore any time remaining on the timeout delay if the presence of VMware Tools running on the guest is detected. In other words, if the startup delay is configured for 120 seconds and the guest actually starts up (and launches VMware Tools) in 90 seconds, VMware can immediately move on to starting the next virtual machine with out waiting unnecessarily for the remaining 30 seconds of the delay time. To activate this option, make sure that the Start next VM immediately if the VMware Tools start option is selected.
The lower section of the dialog presents the current startup order for the virtual machines contained within the host's inventory. Three categories are provided consisting of the virtual machines which are to be started in a specific order, virtual machines that may be started in any order, and virtual machines which are to be started manually. To move a virtual machine from one category to another, select it from the list and use the Move Up and Move Down buttons. When the virtual machine reaches the Specified Order list, the up and down arrows control the position of the virtual machine in the startup order. To remove a virtual machine from the startup order list, press the down button until it moves out of the Specified Order list and into the next category.
To modify the settings for a specific virtual machine, select it from the list and click the Edit button. The resulting dialog provides the option to override the host wide defaults and set specific startup and shutdown settings for the selected virtual machine.
Configuring Background Snapshot Settings
VMware Server provides the ability to take a snapshot of a virtual machine which can subsequently be used to later restore the virtual machine to the exact state that it was in at the point that the snapshot was taken. By default, VMware will take snapshots in the background, allowing the virtual machine to continue running during the snapshot process. This has the possible side effect that performance will degrade while the snapshot is being taken. To avoid this problem, turn off background snapshots by selecting the host from the Inventory panel, clicking on Edit Host Settings and unset the Take and restore snapshots in the background check box. Once the change has been made, click on OK to commit the new configuration setting and dismiss the settings dialog.
| Purchase and download the full PDF and ePub editions of this VMware eBook for only $8.99 |

|


